Home     About     Follow
Showing posts with label Cake. Show all posts

Tuesday, November 27, 2012

Bridal Shower Bliss!

I am so excited to be here right now! Today is the day! Ok so remember my beautiful friend that was engaged a few post back!? Well she is now a married woman! Seriously guys they are adorable! They live in my apartment complex and I go over there all the time and just fall in love with them because they are thee cutest newlyweds ever! 

Anyway! Im getting carried away! So me. Ahem.. Her Maid of Honor. Threw a gorgeous shower for her! {With the help from my wonderful amazing friends!} Like seriously it was adorable, people were talking. 

The theme for this shower was... well... Pinterest. 
I basically got cheap stuff at goodwill {on half off days of course} and booked marked a dozen {incredibly easy} DIY projects and went to work!

{Old picture frame turned into a chalkboard}

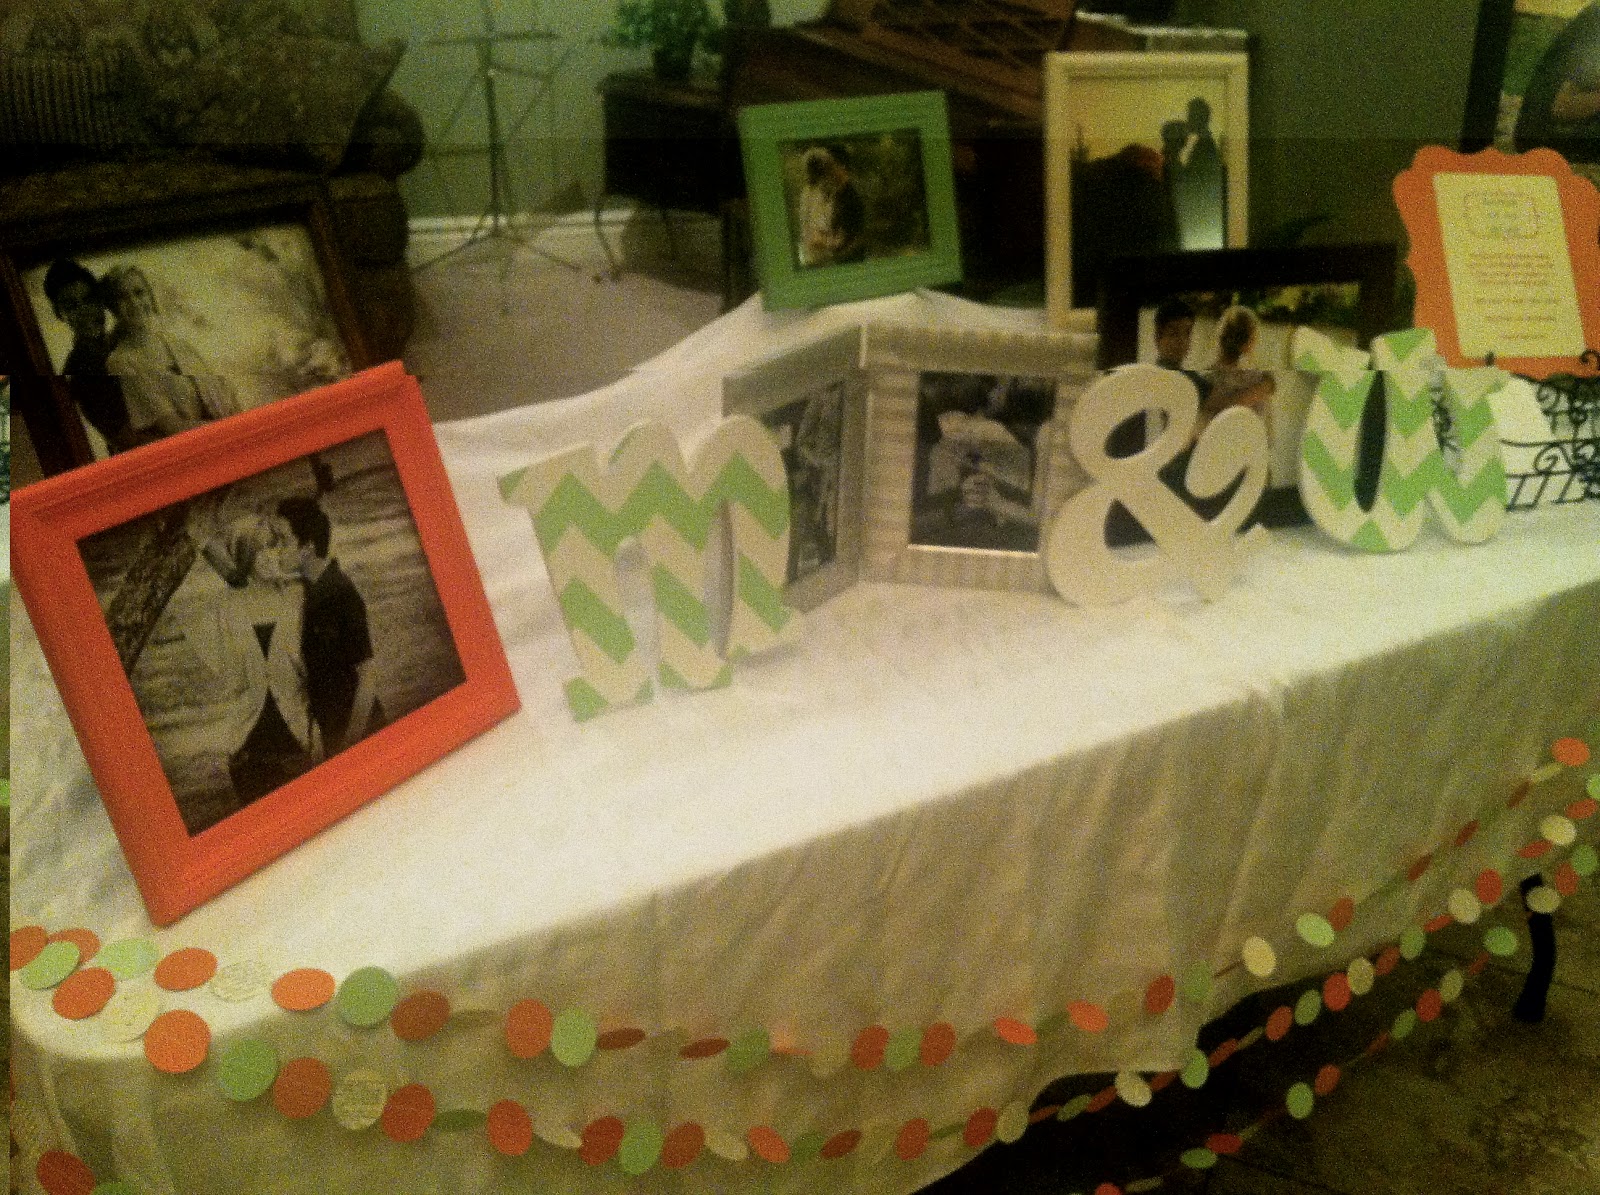
{Front display table overflowing with pictures of the cute couple! Got all the frames at Goodwill or they were donated}

{Got these wooden letters at Hobby Lobby for $1.50 each {{half off}} and painted the chevron pattern myself}

{My super talented Alayna made an incredible Letters to the Bride book. Wish I would of got a picture of it! It was filled with cute quotes, pictures, advice, and letters from those who were close to her}

{A 16x20 print at Costco is only $6!}


{The food tables}

{Got these Wooden Plaques at Hobby Lobby for just under a dollar each {{I wish they would have been half off!}} and made them into chalkboards for cute little labels}

{More chalkboards for the dessert table!}

{Cake Stands. For the tops we used stovetop burner covers, trays, a cutting board, and tart pans all from Goodwill and the Dollar Store}

{Homemade cakes by yours truly! This chocolate and mint one was to die for! I did a frosting technique that is usually used on cupcakes... and it turned out fabulous on the cake!}


{My favorite! They are just so cute and perfect!}

{This monster! Adorable... But extremely heavy!! It was a little hard to get up, but once we did it made the shower!}

{Burlap Banner. I saw a picture of one of these somewhere and fell in love! Basically you cut triangles out of burlap and use stencils to paint the letters, we added colored card stock to the backs for a pop of color and to make the burlap more sturdy. The flags are attached with clothes pins which I love because that means the letters are interchangeable and I can reuse it!}

{Paper Garland. We put these in front of all the tables, I honestly love these! And they were so easy to make!}

 The shower went great! 
I had to snap a pic of Whitney showing Marco all the stuff they got! It was just too cute!

Thursday, February 23, 2012

Easy-Smeasy!

First shout out goes to my momma! It was her birthday on the 21st! {The big five-oh!} So of course I had to make something fabulous! And this cake just screamed my mom! I bet she loves that I'm announcing her big five-oh ordeal! But hey! A girls got to share the story behind the cake!
{Me and my wonderful mother}

Second shout out goes to my new apartment! And my new lovely kitchen that I got to bake in for the first time! Seriously love that kitchen! It's very spacious for an apartment! And it's got a huge window, and I love love love big open windows!
{Yayyy for baking in my new kitchen! And yayy for new cake pans!}

And my third shout out goes toooooo... Pinterest! ...without you.. I would be lost.

Okok.. So back to the cake part! So a friend pinned this gorgeous frosting technique a few weeks ago and I instantly loved it because the description was 'super simple frosting technique' and it was BEAUTIFUL! What wasn't to love?!

Here is a picture I stole from the blog that had the cake on it..
{I won't bother putting the blog link on here because the blog was in a different language! Good thing I don't need instructions, :)I just learn by what I see}

Ok.. so don't get too excited.. because my cake did not look that^^ fabulous! I think it would have been better if I used a denser frosting. I made cream cheese frosting {recipe at the bottom} because it is my mother's favorite! It was my first time! And it was a total hit with the family!
{I added a little extra sugar because I knew it needed to be thicker for what I was doing.. and also because hey whyyy not!? }

So spread all that good stuff all over your cakes

Then with a round tip {I think I used a 10 or 11.. I don't remember! But really it's up to you how big you want the circles to be} make little droplets that look just like Hershey’s Kisses!
 {You can only do one row at a time!}

Then flatten each 'kiss' with the back of a spoon

Like thisss!
{It really is a beautiful design!}

I will warn you.. Once you get all the way back around it gets a little tricky to connect the two ends! My advice.. make sure that part is the back of the cake..

So the top is basically the same thing, except just do one row at a time. Starting with the outside edge: kiss, flatten, kiss, flatten.. and just keep going! So its kind of like a spiral design! 
{Sorry this is my only picture of the top!}

And that's it! Easy-smeasy!! But like everything I do.. time consuming!
{Even used a cake mix for the cake to make it extra smeasy! And with that delicious  homemade frosting.. Nobody can ever tell!!} 

But it was for my mom! So the time consuming part was worth it! <3
{I don't think she knew I was taking a picture.. haha despite that^^ face.. She was veryyyyyy happy with it!}


{Cream Cheese Frosting For Noobs!!}

     Yield: Makes about 2 cups

Ingredients

8 ounces cream cheese, room temperature
8 tablespoons (1 stick) unsalted butter, cut into pieces, room temperature
1 cup confectioners' sugar
1 teaspoon pure vanilla extract

Directions

Place cream cheese in a medium mixing bowl. Using a rubber spatula, soften cream cheese. Gradually add butter, and continue beating until smooth and well blended. Sift in confectioners' sugar, and continue beating until smooth. Add vanilla, and stir to combine.

Thursday, January 12, 2012

Oh My Cake!

Soooo I  picked up cake making a few months ago, nothing too exciting just something i have always have been interested in and after I found a recipe for marshmallow fondant on, of course non other than pinterest! I finally got me the courage to give cake making a spin!!

My first cake, back in Octoberish, went surprisingly well! I had a blast and was immediately hooked!  

Soooo I have made a few more cakes here and there, for fun or birthdays.. noting too exciting... But went my new sister-in-law asked me to make a cake for there wedding i leaped at the chance! The ceremony was very small, about 30 people were there,  so I was not intimidated.. because hey I'm just a noob!!

I did some research for a good recipe that was.. well.. fail-proof! I have been using cake mixes focusing on the decorating part, but I'm making wedding cakes now!! So I decided to start making them from scratch because I'm big girl now!! So I found a fantastic red velvet cake recipe!! that turned out ahhh-mazing!! And I accompanied it with my usual butter cream icing that is a family favorite!

 (Don't worry! Ill include all the recipes at the end!!)

The cake went so smoothly! Easy recipe to follow and again... turned out great! Everyone love it and were very impressed!

                                          I fell in love with the dark red batter! It is so beautiful!

My butter cream icing always has a yellowish tint, it usually isn't a bid deal cuz it was covered up with fondant anyways.. but with the red cake and all i really wanted a brilliant white! so i found some vanilla that is clear, so it wont tint the icing! it was magical! then i added a few drops of whiting food coloring and got the white i was looking for! it was gorgeous!
 (You can buy the vanilla at Walmart, but don't be mistaken! It is NOT in the baking isle! ...I looked. it is in the cake decorating isle, which is on the other side with the crafts, I just thought that was strange!)

  Tier 2 out of 3! 

The flowers my lovely mom cut out of fondant
                                      
                                            
 Lets just say my family hates when I bake! They sayyyyy that I make a huge mess and hog every bit of counter space!? Ha, I guess they are right!

 I made my 4th trip to the store to get this fabulous black and white ribbon! It really made a huge difference!

 My mom made the 5th trip for this cake to find a cake topper, she came home with these lovely pins, and the black frilly thing on top that really made the cake!! i was so thankful for these pins! they saved so much time and made putting on the pins a breeze and they looked beautiful!!

                      I added some finishing touches! And I was done!! Ahhh! It really is a stunning cake!


                      The cake was such a hit at the party! lots of complements and it tasted delicious!


                                                       Isn't the red and white just beautiful!?

                                               My brother enjoying his second piece of cake!

And i thought id throw in a pic of my beautiful family!! (Left-Right: {Back} Stephen, Skylar, Dallin, Jared, Ethan, Ethan's wife Malissa. {Front} Emily, Dallin's girlfriend Amanda, Jared's NEW wife Sara, me, Mom, and Dad!!) Kylee, who lives in California is missing:/ but now there is 13 of us!!! Wow!
                                            

RECIPES!!!

Red velvet Cake! It really is fail-proof!

  • 1/2 Cup butter
  • 1 1/2 c. sugar
  • 2 eggs
  • 2 oz. red food coloring [this is 2 bottles, I only use 1 bottle and then fill the bottle with water and add to make up for the liquid]
  • 2 T. cocoa
  • 2 1/4 c. plain flour [not cake flour]
  • 1 scant t. salt
  • 1 t. vanilla
  • 1 c. buttermilk (I used 4T dried buttermilk and it came out fine – just add it and water as you would regular buttermilk)
  • 1 t. baking soda [try to get the lumps out before you add it]
  • 1 T. vinegar
  1. Preheat oven to 350.
  2. Grease and flour two 8″ pans [or use cupcake papers if you make cupcakes, or a sheet pan]
  3. Cream butter, sugar, and eggs in your mixer with the paddle attachment.
  4. Mix together coloring and cocoa and add to mixture.    This stuff is a mess.  My white mixing bowl is now a pretty pink mixing bowl.
  5. Add salt and flour with buttermilk and vanilla (do not mix any longer than necessary or it will toughen the cake).
  6. Alternately add soda and vinegar and don’t beat hard, just blend. Bake in two 8″ greased and floured pans. Layers may be split to make 4.
  7. Fill two baking pans or muffin tins.  Bake for 15-20 minutes for cupcakes, 30-40 minutes for cakes.  Cool completely before icing.
{She, the lady that I stole the recipe from, included a recipe for frosting. But this is not the one I used! Here is her blog if you want to see it! Two Skinny Jenkins}

Frosting for red velvet cake:
  • 3 T. flour
  • 1 c. milk
  • 1 c. butter
  • 1 t. vanilla
  • 1 c. granulated sugar
  1. Cook flour and milk on low heat until thick. Cool completely.
  2. Cream sugar and butter and vanilla until fluffy. [You can't really overdo this stage]
  3. Add flour/milk mixture.
  4. Beat until mixture is like whipped cream.
  5. Spread on layer. Sprinkle with coconut or chopped nuts if desired.
  6. Keep cake cool (the icing is best cold).
Andddd here is my recipe for butter cream icing!

Ingredients:

  • 1/2 cup solid vegetable shortening
  • 1/2 cup (1 stick) butter or margarine softened
  • 1 teaspoon vanilla extract (or the clear vanilla if you want it white!)
  • 4 cups sifted confectioners' sugar (approximately 1 lb.)
  • 2 tablespoons milk

Makes:

About 3 cups of icing.

Instructions:

1. In large bowl, cream shortening and butter with electric mixer. Add vanilla. Gradually add sugar, one cup at a time, beating well on medium speed. Scrape sides and bottom of bowl often. When all sugar has been mixed in, icing will appear dry. Add milk and beat at medium speed until light and fluffy. Keep bowl covered with a damp cloth until ready to use.
2. For best results, keep icing bowl in refrigerator when not in use. Refrigerated in an airtight container, this icing can be stored 2 weeks. Rewhip before using.
3. For thin (spreading) consistency, add 2 tablespoons light corn syrup, water or milk.
4. For stiff consistency, omit butter; substitute an additional 1/2 cup shortening for butter and add 1/2 teaspoon No-Color Butter Flavor. Add up to 4 tablespoons light corn syrup, water or milk to thin for icing cakes.

And as for the marshmallow fondant... here is a link! Marshmallow Fondant

All in all!! A success! I got a text from a friend today asking if I would be interested in making a Las Vegas themed cake for a bridal shower! I'm totally psyched!!